
SO YOU’VE DECIDED TO REMODEL
Measuring your space is a critical step in determining your room layout. Here is a simple guide outlining the tools you’ll need, step-by-step instructions on how to measure for kitchen cabinets, and some important tips.

MEASURING A ROOM PROVIDES CONTEXT
While most designers will field measure your site at some point, having rough dimensions and images available for the initial meetings are helpful in determining the overall scope of the project.Schedule your FREE consultation
SUPPLIES YOU’LL NEED
- A 25’ long tape measure
- Pad of paper, preferably grid paper
- Pencil or pen, and another writing instrument in another color or a highlighter
- An extra set of hands
HOW TO MEASURE A ROOM STEP-BY-STEP
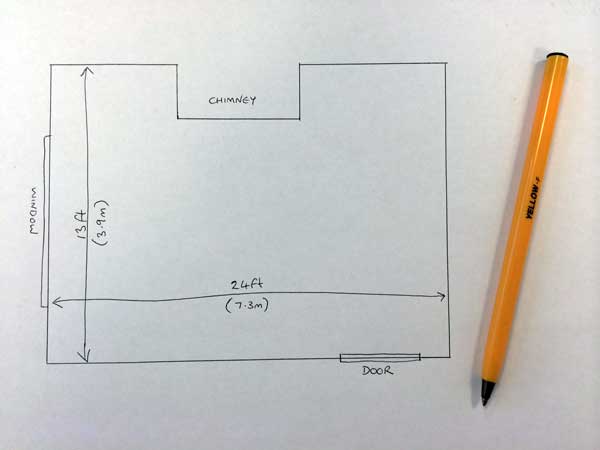
To begin, draw an outline of the room
Measure and note the ceiling height
Measure and note all wall lengths
Check corner ‘squareness’ at the floor, base and wall cabinet levels to determine if you will have any issues during installation.
To check for corner ‘squareness’:
- Mark a point 3 feet out from the corner of one wall
- Mark a point 4 feet out from the corner of the adjacent wall
- Measure the distance between the two marked points, if the distance is 5 feet, the corner is square (If your walls are not square, don’t worry, a good installer will be able to work around any issues by using shims between the cabinets and the wall)
Measure and note the location of obstacles along each wall, recording their height, width and depth from outside edge to outside edge (Include doors, windows and pipe chases)
Identify and note existing plumbing, electrical and lighting centerlines on all walls including:
- Plumbing
- Range hook-up
- Light switches
- Electrical outlets
- Lighting fixtures
- Phone jacks
- Heating/Air vents
Record the height from finished floor for items like windows, outlets, and vents
Record measurements of any free-standing furniture pieces or appliances that may stay in the room
Have an electrician check the electrical service panel conditions to ensure it can handle any change of appliances you may be making in the kitchen
If attic or basement walls will be affected by the renovation, make sure any plumbing or venting changes are verified by a professional

IMPORTANT TIPS
- Note window size and placement along with trim and sill dimensions
- Note locations of ventilation and duct-work on your drawing
- Measure any items that will stay in the room and relate to your floor plan
- Make note of any electrical details, such as switching and outlets that need to stay, or could possibly be moved
- If you will be working around existing lighting fixtures, list their dimensions to avoid any obstruction with taller items like pantry cabinets, refrigerators or crown moldings